Sunday, 2 May 2010

A commision

A customer that wanted to buy this bracelet that I had for sale in my Folksy shop also wanted to commision me to make earrings and a necklace to match.


She asked me to make two pairs of earrings


Meet my newest creation

This project has been on going for a couple of months, I created a round bead on a centre of cork clay, and it has been sitting there waiting for me to make my mind up as to what I was going to make using it. I thought of adding texture and making a fancy bead but I couldn't visualize the end result, so it sat there and waited for me to come up with an idea.... then it came to me I would make it into a little cartoon-type fish bead..... meet Finny Fish (she did have another name, but as was pointed out to me on the beadbuddies forum it was a just bit inappropriate)


After she was taken out of the kiln I noticed a few cracks in the silver, I havn't got a clue why it cracked, I fired at 650c as recomended for anything with a combustible centre, it had been left long enough to be thoroughly dry, I patched it up with oil paste and refired.

I am pleased with the results she is very cute.

Sunday, 14 March 2010

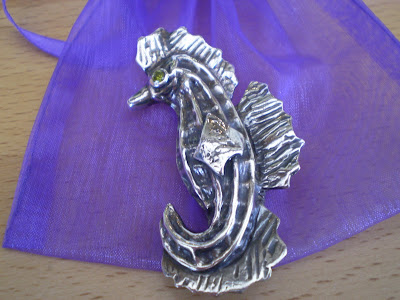
Seahorse

I found a seahorse tutorial on the Artclay website in one of the quarterly newsletters, seahorses are one of the animals that I like a lot, so I couldn't resist having a go at making one.

The first thing was to make a cork clay shape of the seahorse, let that dry for at least 24 hrs. draw the design in pencil onto the cork then follow the lines using syringe type clay.


The tutorial left the design open like basket weave, but I decided to cover the lines of clay with paste clay, applying thin coats drying between each coat.


The eye is a 3mm. cubic zirconia.


I made templates for the fins, textured them then cut them out of the silver clay, after drying I attached them to the body


Here he is after firing...... very handsome!

After a couple of hours polishing by hand and in the tumbler, oxidisation with liver of suphur I polished him back so the detail stands out, this is the result and I am very pleased with him.

Just one more thing I forgot to mention.... the brooch fastening I used a fine silver brooch pin which went on ok, I had to build on the back to create a base for the two ends of the pin, one of them came off while I polished it, obviously I didn't take care to add enough syringe to the joint, I eventually managed to solder it on after three or four attempts. Oh and I put the ends of the pin on the wrong way round. that's a mistake that I shouldn't make again?
This project has been good for me to complete, it has enabled me to practice a few different techniques.


Tuesday, 2 March 2010

Sunshine awards

I would like to thank Tracy @ cinnamonjewellery.blogspot.com and
Janice @ wellydog.blogspot.com for the Sunshine Awards for my blog.


I have to apologise for not mentioning it on my blog before now and not sending the awards to other bloggers.


I have just started a new job after being out of work since November last year, it has been a bit of a shock to the system, along with a busy family life, there just has not been enough hours in the day.


Hopefully I will soon be sending these awards out to others out there in blogger land, when I can find the time to read and choose 24 deserving bloggers from the thousands of you out there.


Some of my family, my son-in-law is missing from this picture and it was taken a couple of years ago, there are two more grandchildren due this year.

Sunday, 21 February 2010

I love chainmaille

I've just discovered that I love doing chainmaille.

Because I like to incorperate it with my metal clay items I have to use sterling silver, so it can be a little expensive but worth every penny for the effect it gives.


I had started using jumprings as an accent on pieces, like these two hearts...


These are my first two items.


This little bird needed a special necklace to showcase it....

I think this byzantine chainmaille and Solalite chip necklace did the job perfectly.

Got to do more soldering on this one too.... bonus!


Friday, 12 February 2010

Flower Ring

Because I am doing my level 2 instructor course in October this year I need all the practice that I can get in between now and then, so every time I have an idea for a design ( within reason because of the cost of the clay), I try to make it while it is still fresh in my mind, sometimes they turn out somewhere near the original design sometimes not.

This ring did end up somewhere near.

I am very pleased with the shine on the inside of the ring, this is one of the techniques that I need to improve on, while making my pieces of silver.
The other thing with making rings is the join, the ring needs to be seemless.

I oxidised it with liver of sulphur, but I think it may be a bit overdone as it looks dull.


While I was polishing it one of the leaves dropped off, I should have used more paste while I was assembling it, this gave me the chance to practice my soldering techniques, at the same time the torch would burn off the oxidisation.


After soldering, (as you can see by these pics, was successful)

I probably will oxidise it again because I like the effect, it makes the detail of the texture pop, but I won't do it so dark.

Wednesday, 10 February 2010

Wierd and Wonderful

More weird than wonderful, here are a few pieces that I have made using silver clay and a bit of artistic licence.

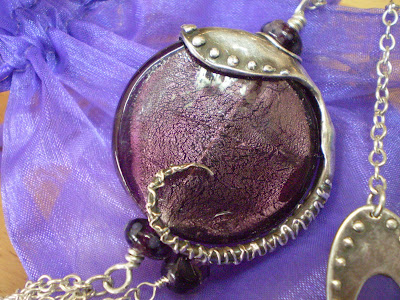
This pendant isn't too weird? The disc bead I bought in Portugal so I wanted to do something with it.


This one I was quite pleased with, it turned out like the original design.


I must admit even I find this brooch a bit strange!

Sunday, 7 February 2010

Some of my favourite art starting with...

These, I think are fabulous.

Find them on Folksy http://www.folksy.com/shops/HilltopPaintings


Antonio Gaudi

Just a couple of pics. of my very favourite designer/artist.


Just amazing, they are so organic they look as though they have grown.

Saturday, 6 February 2010

First Silver Clay Class

I was so excited to be attending the Introduction to silver clay class, I love learning new stuff.

The class was taking place at Burton Manor in Burton on the Wirral over three days, and as I've mentioned Tracey Spurgin was our tutor.

These classes start in the evening usually from 8pm - 9.30pm. the first evening, because meals are included in the course fee students arrive early, it seemed a weird time to be starting a course, I couldn't understand why it couldn't be condensed into two days but as the course progressed I understood why.

During the evening meal all the students and tutor get to know each other, what a great ice-breaker! and by the way the food is excellent.

After dinner we all went into class and made a start on shaping the cork clay to make the core for one of the projects, as cork clay takes a while to dry out and it has to be thoroughly dry before firing.

We were given the clay and findings all the ingredients we needed for our creations, each of us had a basket of tools on the table, Tracey talked us through what we would be doing on the course, then off we went home, looking forward to the next two days.

These are what I made


The heart was made using the cork clay as a form, using the syringe type clay, this is slightly thinner clay which is bought already in the syringe and this can them be piped out like you would decorate a cake.

I had to measure my finger using a ring measure, and because the clay shrinks while it is being fired the ring has to be made three sizes bigger.

Once made, it is dried on the ring mandrel, then it is refined by sanding, (a lot of sanding) filling in any flaws and dints with the syringe clay, drying again, sanding again until it is smooth and flawless (as they say, 80% of the work on the piece needs to be done at this the dry stage) then decorating it using the syringe clay.

The earrings, after choosing the style and shape after drying and sanding, they are fired and we were shown how to achieve a mirror finish by polishing using sanding sponges and papers, I didn't get that high finish required on these earrings, but having been put through the tumbler they ended up with a fairly respectable shine.

We then added the resin, this resin is cured using a UV light, brilliant! all sorts of things can be added to the resin before it is cured - glitter, micro. beads, it can be tinted any colour, there are specialist resin tints but acrylic paints work just as well.


The pendant was textured using a texture mat, we had loads of mats to choose from, loads of cutters and template shapes, how I ended up with this boring shape I just don't know, hence the heart stuck on it, even that fell off and Tracey soldered it back on, brill... I needed a lesson on soldering.

The leaf pendant was made using silver clay paste, certain leaves, ones with a good veining not hairy or waxy, make a good template.

The paste is stippled onto the back of the leaf in layers, drying the paste in between each layer, when the layers are thick enough and thoroughly dry the leaf is refined, edges sanded, then it is fired.

The best thing about these courses is that you learn so much more than how to make these particular items, there are so many tips learned not just from the tutor but from the other students, who by the way were a great group, very knowledgeable in lots of areas quite a few were silversmiths or had a background in jewellery making, and they were very generous with their knowledge.

Before I came home I had signed on to the advanced course being held in the August.
5 months to go I couldn't wait...