Wednesday 21 March 2012

Introduction to Silver Clay Workshop


I held a second Introduction to silver clay workshop last Saturday.

The first one was last October, but I didn't get around to blogging about that one.

It was successful... as in everyone enjoyed it and made some lovely things, but because it was the first one I had a few timing issues, so I didn't have time to take photo's.

So I had a good talk to myself and made a list of all the things that I needed to change.

I hold the workshops in my local community centre, an ideal location as it is only down the road from me and all on one level.

Unfortunately the venue had to be changed at very short notice
as they were having some refurbishment work done, as it happens there is another venue only a few metres down the road which was ideal.

There were three students all women, and a friend of mine who had attended the previous course, and had volunteered her services to help me set the room up, make tea, coffee etc.

The ladies were all lovely, and friends of each other so the atmosphere was good from the outset.

Before starting with the silver clay they worked out possible designs with polymer clay.
All went well and finished right on time.

Here are their makes, Didn't they all do well?


Sarah


Jean


Denise


Ann (from previous workshop)


Monday 5 March 2012

Sterling Silver Clay

I was really looking forward to working with the sterling silver clay that Mitsubushi were developing.

I waited for it to come on sale and In the mean time I followed all the jewellery designers that were working with it before it came on sale for the rest of us.

I usually work with Art Clay so I knew this new clay would be quite different.

I already had a few designs in mind the first one was a pendant, the design I had in mind needed to be in relief, I tried a few ways of making a mould but I wasn't happy with the results.

I had recently read about a technique called water etching, which looked like it could be the way to go.

This design will have three "firsts" for me:-


1. the clay.

2. water etching.

3. hinges.


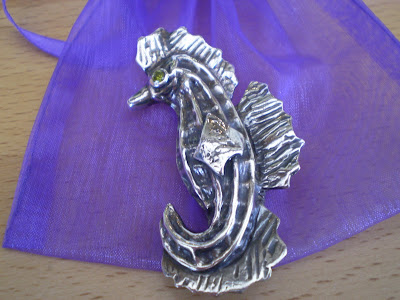
The pendant was going to be a beetle with a design on its back
(the pendants front).
I wanted the pendant to have a front and back joined by a hinge.

After buying the clay it took me a while to get around to starting, I made a template for the shape of the front, textured one side and dried it texture side down, on the top of a light bulb to get a domed shape.

When it was dry I refined and smoothed the shape using sanding pads, the design was drawn on the clay in pencil.

I used nail varnish as a resist, and using a fine brush painted over the pencil lines, after leaving the varnish to dry thoroughly and taking a slightly damp natural sponge I rubbed away the clay in between the nail varnish lines.
The drilled hole was for a design idea that didn't work.


when it was dry I created a shape for the back of the pendant, textured it both sides and dried it flat.

The next step was the hinges, using a clay extruder and the round holed disc I extruded a length of clay about 5cm. long, when the clay was leather hard I cut 0.5cm discs and pushed a needle through the centre of each disc as a guide hole for the drill later on.

Once I had refined each component it was time to put it together, as the sterling silver clay is stronger than silver clay it can be rolled out thinner, and it is quite flexible in its dry state, which worked in my favour with the back, as it needed to be manipulated a little.

I had decided to put a loop on the back of the front piece, then a slot in the back piece to fit over the loop (fingers were crossed at this point).


I wasn't sure were to put the hinge, this bit was guess work, I put two discs on the front, one on the back. It took a lot of putting them on and taking them off again before I got it right, once they were dry I drilled through the three pieces.

I also added oak leaves to the front of the back piece. Once everything was dry I fired all the pieces following the instructions that came with the clay, which is in two stages, first they were put into a cold kiln at 538c for 40mins. after letting them cool for a while, they were put into activated carbon in a stainless steel container at 815c for 2 hrs.the firing times are slightly longer than the instructions state but I always leave art clay in for that length of time.

When I took them out the clay had blistered quite badly, mainly on the undersides.
I didn't take photo's at that stage, I don't know why but I had pondered on what I could do about it and couldn't wait to get the blisters knocked out, this partially worked and left a bit of scarring luckily most of this is in the inside, and this piece is a test piece and not going to be sold.


I wanted to find out why this happened so got in touch with The PMC Guild, the answer was they didn't know either. Apparently this happens very rarely and they are trying to find out the reasons and rectify it. And they have promised that they will replace the clay, which is very fair.

With a little bit of jiggling and knocking about the pieces were put together.


I used Liver of Sulphur to colour the silver, polished the raised areas so the design was bolder, plus I love to patina silver you never know what the colour result will be.

The antennae are 1mm. sterling silver wire threaded through the hinge, looped and then hammered, which acts as a bail for the chain.

I really enjoyed working with the sterling silver clay, I found it could be worked easier than other clays, I also thought it was stronger when dry and less likely to break, and of course it is so much stronger when fired, I did knock it about a great deal, what with trying to get rid of the blisters and altering a few other bits.
I will look forward to making my next piece with sterling silver clay.

Sunday 2 May 2010

A commision

A customer that wanted to buy this bracelet that I had for sale in my Folksy shop also wanted to commision me to make earrings and a necklace to match.


She asked me to make two pairs of earrings


Meet my newest creation

This project has been on going for a couple of months, I created a round bead on a centre of cork clay, and it has been sitting there waiting for me to make my mind up as to what I was going to make using it. I thought of adding texture and making a fancy bead but I couldn't visualize the end result, so it sat there and waited for me to come up with an idea.... then it came to me I would make it into a little cartoon-type fish bead..... meet Finny Fish (she did have another name, but as was pointed out to me on the beadbuddies forum it was a just bit inappropriate)


After she was taken out of the kiln I noticed a few cracks in the silver, I havn't got a clue why it cracked, I fired at 650c as recomended for anything with a combustible centre, it had been left long enough to be thoroughly dry, I patched it up with oil paste and refired.

I am pleased with the results she is very cute.

Sunday 14 March 2010

Seahorse

I found a seahorse tutorial on the Artclay website in one of the quarterly newsletters, seahorses are one of the animals that I like a lot, so I couldn't resist having a go at making one.

The first thing was to make a cork clay shape of the seahorse, let that dry for at least 24 hrs. draw the design in pencil onto the cork then follow the lines using syringe type clay.


The tutorial left the design open like basket weave, but I decided to cover the lines of clay with paste clay, applying thin coats drying between each coat.


The eye is a 3mm. cubic zirconia.


I made templates for the fins, textured them then cut them out of the silver clay, after drying I attached them to the body


Here he is after firing...... very handsome!

After a couple of hours polishing by hand and in the tumbler, oxidisation with liver of suphur I polished him back so the detail stands out, this is the result and I am very pleased with him.

Just one more thing I forgot to mention.... the brooch fastening I used a fine silver brooch pin which went on ok, I had to build on the back to create a base for the two ends of the pin, one of them came off while I polished it, obviously I didn't take care to add enough syringe to the joint, I eventually managed to solder it on after three or four attempts. Oh and I put the ends of the pin on the wrong way round. that's a mistake that I shouldn't make again?
This project has been good for me to complete, it has enabled me to practice a few different techniques.


Tuesday 2 March 2010

Sunshine awards

I would like to thank Tracy @ cinnamonjewellery.blogspot.com and
Janice @ wellydog.blogspot.com for the Sunshine Awards for my blog.


I have to apologise for not mentioning it on my blog before now and not sending the awards to other bloggers.


I have just started a new job after being out of work since November last year, it has been a bit of a shock to the system, along with a busy family life, there just has not been enough hours in the day.


Hopefully I will soon be sending these awards out to others out there in blogger land, when I can find the time to read and choose 24 deserving bloggers from the thousands of you out there.


Some of my family, my son-in-law is missing from this picture and it was taken a couple of years ago, there are two more grandchildren due this year.

Sunday 21 February 2010

I love chainmaille

I've just discovered that I love doing chainmaille.

Because I like to incorperate it with my metal clay items I have to use sterling silver, so it can be a little expensive but worth every penny for the effect it gives.


I had started using jumprings as an accent on pieces, like these two hearts...


These are my first two items.


This little bird needed a special necklace to showcase it....

I think this byzantine chainmaille and Solalite chip necklace did the job perfectly.

Got to do more soldering on this one too.... bonus!